Saturday, July 4, 2015

The Power of Paint: Chalk Paint- Take 2

I am dying to revamp my bedroom. I want a luxurious space all my own (well...I guess I will let my husband come in!). I wanted to throw out everythang and start from scratch. But after shopping around I realized that many of the pieces were not nearly as sturdy as my current dressers. After doing some research (aka surfing Pinterest) I came to the conclusion that once again, sometimes all you need is a little paint to reincarnate an old piece. 
I decided to utilize chalk paint. I have been knocking out little projects here and there, and I am slowly being converted into a chalk paint fanatic. Yes, I admit it! The ease of the application despite the higher price tag makes it sooooo worth it. Gasp, clutch my pearls! Is that the Queen of the Land o'Cheapskate speaking?! Yaassss! I love that stuff. 
As before, I used the Folk Art Chalk Paint which is a more cost effective chalk paint (latex is still cheaper, though). I know that Annie Sloan Chalk Paint is supposed to be the absolute best, but that price tag is like a stab to a sista's heart and I just can't do it! Folk Art's paint has been working juuuust fine!
After thoroughly cleaning the piece and applying two coats of chalk paint, I changed up things this time and applied a water-based poly over the chalk paint rather than the wax. Poly is MUCH more durable for high-traffic areas, and you don't have to reapply it every couple months as you would have to do with wax.
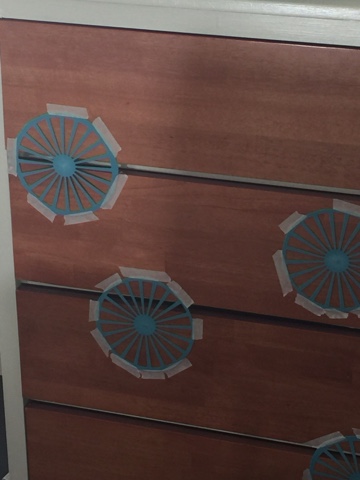
 One of the final touches was the addition of stencil designs to the drawer fronts (check out my blog post on how I made the stencils!). I am still undecided as to whether or not I will add drawer pulls or additional stencils, but for now.... Chalk paint project 2- DONE!


Dollar Store Stencils

I wanted to add some stencil design to some dressers that I was attempting to revamp. If you have ever shopped for stencils, you know that they can get quite expensive. Well as the Queen of the Land o' Cheapskate I must say... "ain't nobody got time for that!" With that said, I decided to see what I could come up with as a stencil on my own. 
My first stop is nearly always the Dollar Tree... aka mi casa #2. You will be surprised how many odds and ends you can find there. Even when you go in to purchase one item you will nearly always end up walking out with 7 bags jammed with goodies. It happens to me ALL the time! Well once again, this trip to the Dollar Tree did not disappoint. I found exactly what I needed to create a great stencil design.
The pics I took pretty much map out the process, so I won't go into any extensive details. Look around at your local dollar store and see what unconventional items you can use for your next project!