Saturday, July 4, 2015

The Power of Paint: Chalk Paint- Take 2

I am dying to revamp my bedroom. I want a luxurious space all my own (well...I guess I will let my husband come in!). I wanted to throw out everythang and start from scratch. But after shopping around I realized that many of the pieces were not nearly as sturdy as my current dressers. After doing some research (aka surfing Pinterest) I came to the conclusion that once again, sometimes all you need is a little paint to reincarnate an old piece. 
I decided to utilize chalk paint. I have been knocking out little projects here and there, and I am slowly being converted into a chalk paint fanatic. Yes, I admit it! The ease of the application despite the higher price tag makes it sooooo worth it. Gasp, clutch my pearls! Is that the Queen of the Land o'Cheapskate speaking?! Yaassss! I love that stuff. 
As before, I used the Folk Art Chalk Paint which is a more cost effective chalk paint (latex is still cheaper, though). I know that Annie Sloan Chalk Paint is supposed to be the absolute best, but that price tag is like a stab to a sista's heart and I just can't do it! Folk Art's paint has been working juuuust fine!
After thoroughly cleaning the piece and applying two coats of chalk paint, I changed up things this time and applied a water-based poly over the chalk paint rather than the wax. Poly is MUCH more durable for high-traffic areas, and you don't have to reapply it every couple months as you would have to do with wax.
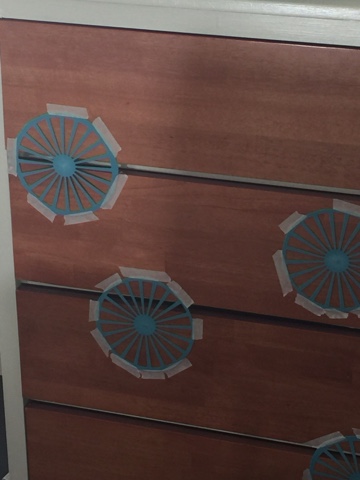
 One of the final touches was the addition of stencil designs to the drawer fronts (check out my blog post on how I made the stencils!). I am still undecided as to whether or not I will add drawer pulls or additional stencils, but for now.... Chalk paint project 2- DONE!


Dollar Store Stencils

I wanted to add some stencil design to some dressers that I was attempting to revamp. If you have ever shopped for stencils, you know that they can get quite expensive. Well as the Queen of the Land o' Cheapskate I must say... "ain't nobody got time for that!" With that said, I decided to see what I could come up with as a stencil on my own. 
My first stop is nearly always the Dollar Tree... aka mi casa #2. You will be surprised how many odds and ends you can find there. Even when you go in to purchase one item you will nearly always end up walking out with 7 bags jammed with goodies. It happens to me ALL the time! Well once again, this trip to the Dollar Tree did not disappoint. I found exactly what I needed to create a great stencil design.
The pics I took pretty much map out the process, so I won't go into any extensive details. Look around at your local dollar store and see what unconventional items you can use for your next project!


Wednesday, April 22, 2015

Power of Paint: Chalk Paint-Take 1


So I finally jumped on the chalk-paint-bandwagon. I have heard ooh's and aah's about the Annie Sloan chalk paint... But I just wasn't ready to fork up that much cash on a product that I still wasn't  convinced would be all that they said it was. In steps Folkart chalk paint.


With a decent selection of colors and a very impressive price tag, I decided to take the plunge and try it. The process is simple... Make sure the surface is clean, and then paint (no sanding). Once the paint dries completely you will need to seal the chalk paint with a wax, and that's it!
It was a wonderful and easy process! I will definitely be using chalk paint  on my next project!


Tuesday, April 21, 2015

The Power of Paint: Painted Subfloor

 My room and hallway had carpet... A dreadful, pepto-bismal pink carpet... The previous owner obviously thought it was cute because she put it throughout the second floor of the home. After looking at the dreaded carpet for a little over a year, I decided that it was time for it to go. My only issue was that I didn't have the funds to install new carpet right away, so I began researching my options. 
Painting the subfloor seemed the most feasible. I found various blogs that offered different methods and I even tried some of them (sanding the floors, putting wood filler on the seams and then sanding), but in the end I was not completely satisfied with the look these methods gave. 
I finally found that the easiest method gave me the best look. The process was simple...Pull up the carpet/padding, remove all staples, sweep the floor really well, go over the floor with a vacuum, and then paint! 
The finishing touch will be to add an area rug.


Tuesday, March 31, 2015

The Power of Paint: Revamped Patio Set

It's amazing what a difference a little paint can make. I have been painting everything I can get my hands on recently. My newest venture was an old rusty patio set that was gifted to me (free is always good... even when it's covered in rust!). 
Green Citrus from Rustoleum was my color and paint of choice. The paint was less than $6 per can. 

All this table needed was a good cleaning, a good sanding, and some paint. Unfortunately in all my excitement I painted the table and one of the chairs before I realized that I hadn't taken a before pic (And yes in my flury of spray paint I managed to paint the chair, table, AND concrete despite the drop cloth! No worries though... I have plans for the concrete)!
So... For less than $30 my table and chairs look brand new. I couldn't be happier with the finished product!


Friday, January 2, 2015

The Power of Paint: Painted Upholstery- Take 1

I suppose I am a bit late on the hype surrounding painted upholstery... But... Better late than never I suppose! I first heard of this process on Youtube while watching a video on Annie Sloan chalk paint. It seemed almost too good to be true with the chalk paints, and in the end it was. Don't get me wrong, the Anne Sloan chalk paint probably works great! But the high price tag, proved for me to be like a cross to Dracula! I didn't want to invest a lot of money in my first painted upholstery project, because in the end I didn't know how it would turn out. So, for a while, I gave up on the idea, until recently when I had a touch of DIY fever after seeing pictures of barbaydian261's upholstered chair that she dyed on Instagram. I searched the internet and Pinterest comparing the processes that different DIY bloggers had used, preparing myself for what I thought would be a grueling, nail-biting-process.

In the end though, it wasn't stressful or hard to do. I highly recommend that you do your research so that you know what to expect. Also, read multiple blogs so that you get the process from multiple perspectives. With all that said, below you will find the products and process that worked the best for my project. I am very satisfied with the outcome, and I will definitely be trying this process again on other thrifted finds!
---------------------------------------------------

I started out with 2 upholstered chairs that I found at a thrift store for $20 (it was a happy day in the Land of Cheapskate when I found those beauties!). After cleaning the chairs thoroughly (yes I am a germaphobe) I sanded down the wood in order to remove the varnish and smooth out some of their "battle scars."

After removing the dust from sanding, I primed the wood surface (any primer will do). I then applied a coat of Krylon ivory paint to the wood portion of the chairs (the same paint that I later mixed with the medium and painted the upholstery with).

Now it was time for the fun part! I mixed the paint and fabric medium at a 2:1 ration. Armed with a spray bottle, I dampened the upholstery first and then applied the premixed paint solution to the fabric with a paint brush. I will forewarn you that initially it will look like crap..... Just be prepared for that "OMG-what-have-I-done" sinking feeling in your stomach.

After the first coat I ditched the spray bottle, and just diluted the solution a bit, this provided better coverage and less of a mess. Once your first coat has completely dried, apply another.... And when that has dried, another...... And another. You want to follow the "paint-then-dry" process until you have completely covered the original upholstery's pattern/color with the paint mixture.


Primed, painted,  and ready to roll!
 
(Purchased from Walmart for $8)

(Purchased from AC Moore for $7)


 After the final coat of paint
 

Once the fabric was completely covered with no signs of the previous color, I allowed the chairs to dry thoroughly (about 36 hours). I then took a blow dryer and went over the upholstered portion that had been treated with the fabric medium (this is per the instructions that are on the fabric medium's bottle). The chairs looked great, but they needed a little something to give them some flair. I added some decorative nails to them and that gave it the final touch that it needed.

Final result
 

Before and After


The chairs feel just like painted canvas, which I am OK with. I am not sure if it would work for a long-term-heavy-traffic chair/sofa, but thus far they are holding up great. There are no issues with the paint transferring to my clothing or anything.  Not bad for the first time, eh?!

Welp.... on to the next project!